Proofreading? Who’s got time for that?
You’ve just wrapped up a 3-hour stint on the clock, typing the final sentence of a 2,500 word article on ‘The Benefits of [insert inane subject here]’.
Bland, hey?
The last thing you want to be doing is going back to reread those 2,500 words, all over again.
I think you’ll agree with me when I say that writers hate rereading their own work. It feels like looking closely at a photo of yourself. Before long, you start to feel really self-conscious.
Well, it turns out, the copyediting and proofreading process doesn’t need to be as painstaking as you think, by breaking down each process into easily performed, mechanised tasks.
In this article, I’ll take you through the perfect copyediting process I religiously follow with every piece of copy I edit.
You’ll be saving your editors a lot of time (and they’ll love you for it!)
Contents
In this article:
- Why Edit Your Own Writing?
- Proofreading Vs Copyediting (Yes, There’s a Difference!)
- Step 1 – The Pre-Editing Phase
- Step 2 – The Initial Proofread
- Step 3 – the First Cuts (Consolidating the Information)
- Step 4 – Template, Subheadings, Keyword Research
- Step 5 – Automating the Editing Process
- Step 6 – The Fine-Toothed Comb
- Step 7 – Get Your Facts Straight
- Step 8 – Formatting Copy for Web
- Step 9 – Final Proofread, Polish and Submit
- Step 10 – Final Check Online, Begin Your Promoting, (Internal Linking to New Post)
Why Edit Your Own Writing?
But first –
Why edit your own work? Isn’t that what the editor’s for?
Put simply – no!
Yes, the editor is there to make you look the best you can be. But, I have had to remove freelance authors from our books more than once because they got lazy, turning in a mash of 1,500-word in-cohesive info-dumps on a weekly basis.
Not only did it reflect badly on the author, it meant I had to spend hours out of my own week rewriting the entire article into something digestible.
If you do not edit your own work – even the bare minimum – you run the risk of biting the hand that feeds!

Editing your own work improves your writing.
A study that compared two groups of English students found that those who peer reviewed others’ work showed significant improvements in their own writing, than those who did no peer review at all (Lundstrom & Baker 2009).
Basically, spending time on the copyediting process will put your writing ability ahead of those other writers who do not.
(It also shows that a bit of practice reviewing a friend’s work can be beneficial to your own writing, too.)
And you’ll want every competitive advantage you can get since there are 440 million blogs out there at last count – chances are, you run one yourself.
With so many writers, you want to be able to stand out from the pack.
Good copyediting practices can apply a layer of polish that not all writers have – this could mean the difference between Google result 50 and Google result 1 for a piece of content.
Proofreading Vs Copyediting (Yes, There’s a Difference!)
By now, you may have learnt that there’s a difference between copyediting and proofreading.
Although people often use the terms interchangeably, they actually refer to two different things.
Proofreading is just a single element of the editing process. It’s the act of scanning for quality, making sure your sentences make sense, and picking up any typos you may have made.
On the other hand:
Editing is a much more holistic approach to quality control. It’s the fine-toothed comb approach. It’s why news corporations employ someone who’s sole job is to edit copy.
Watch this TED talk from Mary Norris, copyeditor for The New Yorker. She explains why editing should be a mechanical process.
The lesson here?
Don’t think that a quick proofread before you hit ‘submit’ on a project is the extent of copyediting you need to do.
Here’s what you should be doing…
Step 1 – The Pre-Editing Phase (Preparation)
Take a Break.
The first step is… do nothing.
Leave your copy for a few hours, or even a couple of days after writing it.
This helps to reset your mind. Writing uses a lot of brain power trying to put meaning into words, (Stafford) and because your brain is so preoccupied, you are more likely to miss mistakes.
You need to reset your brain so it is ready to switch tasks.
Change Fonts.
A simple thing like changing the style of font you wrote in to something different to reread and edit in helps see things differently. This can be especially useful for those visual learners.

You could even go a step further and print your work out as a hard copy, or read sections out loud.
The more ways and angles you look at it, the less likely you are to overlook mistakes.
Step 2 – The Initial Proofread
Imagine:
Spending three days researching and writing an article only to have it rejected by the client because it just isn’t what they had in mind.
This initial proofread is where you get to make sure your article has hit all the criteria of the project, so there’s no surprises after you’ve submitted it.
Read your piece from start to finish.
You want to look out for any points that are jarring to you. This stage is not about making any cuts or edits, but just making sure you’re getting your message across.
Refer back to the tone of the rest of the website / client’s products your writing for. Does it match the tone and brand? Does it make sense?
Refer to the client/website’s Style Guide. (If your site does not have a style guide, it’s a good idea to put one together. More on Style Guides to come.)
Think about who your audience will be. Will they understand the message you are trying to convey?
These are all obvious points and really copywriting 101, but often when you hit that state of flow in your writing its hard to stop. And before you know it, you’re off on a 600 word tangent.
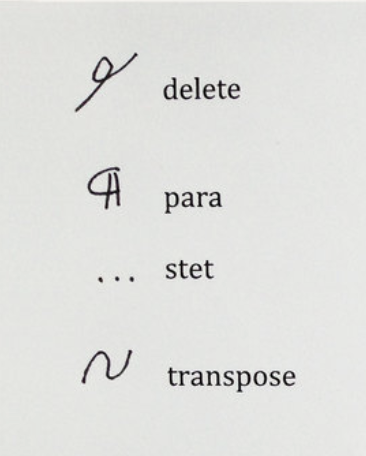
This stage is all about scanning for any glaringly obvious problems with the copy. It should be quick and you should jot notes down or use a symbol to flag where something needs to be changed.
For more on editor symbols, check out this great piece from NY Book Editors:
Step 3 – the First Cuts (Consolidating the Information)
Now we can get the scissors out.
You want to go back to any sections you flagged in the previous step that simply don’t belong, and remove them.
Maybe they don’t stay on topic to the overall aim of the article, or perhaps you tried to shoe-horn in a quote you really like but it’s just not necessary.
This is still just a first-pass – save the fine-toothed comb for steps 4 and 5.
Once you’ve trimmed the fat, group each section into a topic.

Each paragraph or series of paragraphs should be conveying a different topic. You may find that paragraph one and paragraph seven may actually be discussing the same thing and should be grouped together as such.
This process will help consolidate everything, making it a more cohesive read, with clear sign-posting.
Which leads us into…
Step 4 – Template, Subheadings, Keyword Research
Now you’ve defined each section into cohesive standalone topics, you’ll need to assign subheadings.
With web copy, subheadings are not only about describing what a paragraph talks about. Your H2s and H3s actually play an important role in optimising your content for search engine crawlers.
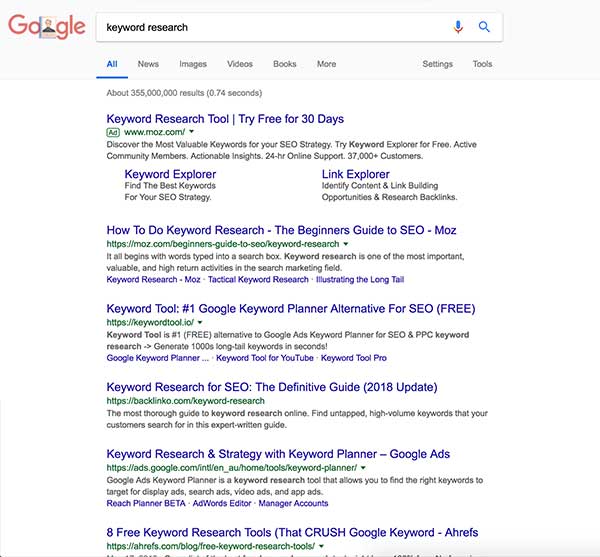
Your subheadings should match a keyword.
There are hundreds of fantastic guides to performing SEO keyword research online that you can read on how to do this. I suggest checking out:
- White Hat SEO Case Study: 1,000+ Daily Visitors (In < 6 Months), and
- KEYWORD RESEARCH FOR SEO: The Definitive Guide.
I like to use the following tools in particular, which are good places to start for working out how to word your headings and sub-headings:
- KWFinder
- Ubersuggest
- LSI Graph
- Ahrefs
- Google’s top results (-duh!)
If you’re writing for another organisation, they will likely have somebody else in charge of their SEO and online marketing, and so this step may not be as important, however doing this may still save them a significant amount of time, which will be much appreciated.
And we all know, happy client = more jobs coming your way.
Step 5 – Automating the Editing Process
If we refer back to Mary Norris’ TED talk, she makes the point that copyediting should be a mechanical process.
As we’ve established, you’re going to miss things reading 2,000 words top-to-bottom. It’s just inefficient.
This step helps us to mechanise our editing process and really save time.
Create a document with a list of words you regularly use that you simply must spell correctly.
This may include industry specific terms, instances where your style guide specifies a way to spell a word that has more than one spelling, or UK-English grammar that routinely gets autocorrected to US-English (think: ‘specialise’ and ‘specialize’.)
This list of words will never be completely finished – you’ll be adding to it all the time as your work portfolio grows.
It helps to remind you of things to check off, that you may miss due to bad habits, skim reading, or you’re simply used to using a different spelling.
For example, working in healthcare information, I have a specific style guide that simply must be adhered to. Our organisation has made decisions to spell certain words a specific way.
These words include ‘wellbeing’ (not ‘well being’ or ‘well-being’), healthcare (not ‘health care’), paediatrics (not ‘pediatrics’) etc.
It’s about ticking the boxes.
Once you have your list, work from the top and CTRL-F the beginning of each word. When an instance is highlighted that needs fixing, change it and move on.
At this stage, you’ll also want to run a quick spell-check. You can get some great tools and applications to do this (I use Grammarly – it lets you customise your settings to suit your writing), but even WordPress, Microsoft Word or Google Docs will do fine.
The last thing in this step is to space your text out into readable chunks of a few sentences per paragraph (max.).
Many of us were taught in school to write in paragraphs of 250+ words. This is just not conducive of reading on the web (or a computer screen!)
Step 6 – The Fine-Toothed Comb
Now it’s finally time to drag that fine-toothed comb through everything.
Do a second pass over your article. Reading through each chunk of writing should be a lot easier now you’ve broken them up into digestible pieces, and removed any glaring mistakes.

Now you can really take the time to hear how your writing is sounding. At this point you should be looking out for:
- Superfluous language – wordiness (sure your vocabulary is impressive, but save it for your great Australian novel)
- Poor writing in general – remove anything that sounds clunky, repetitive words, etc.
- Add what’s missing – you may find two ideas are missing a sentence to bring them together cohesively
- Tone – is it consistent?
- Voice – use active
- Perspective – who’s narrating? Are they a first-person narrator?
- Do your lists make sense?
Now perform your final spell-check.
For this, I use Grammarly. Not only will it check your spelling, it will let me know of any overused words, phrases or poor use of grammar.
Step 7 – Get Your Facts Straight
This may seem obvious, but the last thing you want is to receive an angry email six months from now from someone who followed some mis-quoted advice in one of your articles.
Or perhaps you were a little over-zealous with your quoting, and you’re now up for copyright infringement.
Each time you make a claim, check and double check it is correct. Not only will it cover your back, it will give you a reputation as a thorough researcher who always performs due diligence, as well as a good writer.
Try searching with Google Scholar for your topic for any additional resources. It’s an incredibly easy-to-use resource to find research on any topic, from reputable studies and sources.

(Having accurate sources also comes in handy when winning any arguments from know-it-alls in the comment section – though I suggest you just hide and block…)
You should also make sure your referencing is consistent. It’s good practice to reference in-text, so your editor or reader can check a source later down the track if they need to.
Your style-guide should lay out what style of referencing is preferred.
I generally use a modified version of Harvard style referencing. Sydney University have a good guideline PDF I like to refer to here.
If you’re using the paid version of Grammarly, it also has a plagiarism checker. This is incredibly handy when editing other people’s work that you intend to publish on your site.
You just copy the text into Grammarly and it gives you a score out of 100 on how much has been copied from somewhere else on the web.
Alternatively, you could just Google sections of the writing and see if there are any matches in the results (a guide to copyright coming soon).
Step 8 – Formatting Copy for Web
This step is for those who are self-publishing, or if you want to make your editor’s job redundant.
Correct formatting for the web is an important part of copywriting.
If you haven’t used the correct formatting, search engines are going to struggle to find your content, and as a result your traffic is going to take a hit.
This is just as much about user experience as it is about SEO.
There’s several key things to remember when formatting for the web:
Don’t BOLD your subheadings. The correct hierarchy should be H1 for the page title, H2 for sub-headings, and H3 for any sub-subheadings.
I like to use H4 for the first line of text in a new section, to denote or summarise the following ideas.
Bold should be used when you are trying to make a point you want your reader to remember, but it is also used to direct search crawlers to particular keywords in your article.
The best practice is to bold phrases or sentences, not just single words, as this can begin to look like keyword-stuffing, and it’s also not a pleasant experience for the reader to see random words bolded mid-sentence.
Italics or emphasis can be added for title’s of books or movies, for dialogue, or for special names like latin words for a plant, for instance.
Also make sure to include any links you want to use in the body of the text. If you’re submitting your piece to an editor link the anchor text you want to use, but also write out the full link in brackets next to the text, so the editor can easily copy and paste the link themselves.
It’s also a good idea to make your links open in a new window, so readers don’t get driven away from the page before they’ve finished reading your article.
Step 9 – Final Proofread, Polish and Submit
You’re nearly there!
Of course, we’d be remiss if we didn’t go back to the start and give our article one final read through just to make sure you didn’t accidentally backspace through a paragraph while spell-checking!
Take this opportunity to enjoy how your article looks and flows now. If you compare it with how it was before the editing process, you’ll notice how much more professional the result is.
If you see anything that needs polishing, go ahead and change it. Add in a few block quotes, or maybe a drop cap in the first sentence, etc.
Now you’re ready to submit your article!

Step 10 – Final Check Online, Begin Your Promoting, (Internal Linking to New Post)
Once your article has been uploaded or sent to be published, don’t forget to visit the URL and check that everything looks OK.
A lot of people forget this step and it can make all that work for nothing if half of your piece got cut off while refreshing the WordPress page.
All there?
Great!
Now you can begin your promoting, and don’t forget to add internal links to any other related posts you may have.
There are some great resources on promoting your articles online, I suggest you check out some of these:
Thanks again for reading! This was a long post but I hope you learnt something.
If you have any tips or feedback, don’t hesitate to contact me or post in the comments below.
And I’d love it if you share this post with any other bloggers out there who you think will find this useful.
For more tips, check out this great video from EditingHacks: